Supplies:
- Trimmer
- Letter-Sized Manila File Folder
- 2 or 3 Sheets of 12x12 Double-sided Designer Paper
- Labels for Pockets, printed on Copy Paper (Template is HERE)
- Red-line Tape or STRONG Double-sided Tape
- Stamps and Ink to Decorate Planner
- Bone Folder
Optional: Oval Punch and Matching Cardstock

Step One:With the folder closed, trim the Folder to 8". This will cut off the tabs and allow for even measurements.
Step Two:
Open the Folder. With the centerfold vertical, bring the bottom of the file up 3" and crease to fold.
Step Three:
With the bottom flap folded up, have each end of the file folder meet in the centerfold, and fold both ends with the bone folder. Fold the piece so that there is a Valley Fold, Mountain Fold and Valley Fold.
Step Four:
Cut 8 pieces of the Designer double-sided paper to 7-1/2" x 3-3/4". Note: you may have to cut these down a bit for your folder if the measurements are slightly larger or smaller than the brand I used.

Step Five:
Adhere one piece to each of the 8 panels (four in front, and four on the back). I mixed and matched my designs.
Step Six:
Cut 4 panels to 3-3/4" x 3". Close the fold and attach the 4 pieces to the 4 front panels .
Step Seven:
Open the bottom fold. Add double-sided tape to the creased lines, and the two outer edges of the fold. Do NOT apply tape to the bottom edge.
Step Eight:
Remove the backing from the tape and fold up; press firmly to adhere.
Step Nine:
Create labels for the pockets (mine can be found HERE). Decorate as desired and uses punches and cardstock to decorate them, if desired.
Step Ten:
Attach labels to the bottom flaps of the pockets.
Step Eleven:
To make a receipt holder, glue the flap on a regular-sized envelope. Cut the top off, then use 1/2 of a circle or oval punch to create an opening. Decorate as desired, then slip into the receipt pocket.

Step Twelve:Create a belly band to close the Planner by cutting a 1-1/2" x 12" strip of Designer Paper.

Step Thirteen:Fold the band around the outside of the planner, overlap the folds by 2-1/2" and use adhere the ends. Cut off any excess paper. NOTE: I made my bands loose so that when I have paper filled in my planner, it has room to expand.
Decorate the front of the planner, add paper to the inside (I created my own, using THIS line template), and you are done!
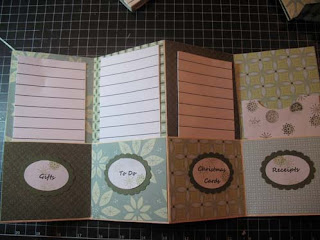
I loved this so much, I made THREE! One for me, one for my sister in Virginia (I am visiting there this weekend!) and one for one of my SIL's... I love making these!